
Face of the day (FOTD) + Chic Everyday Makeup Tutorial
Hey girls!
So the sun was out yesterday here in London, which inspired me to show you girls my “Face of the day” and do a quick makeup tutorial on this look!


This is a very chic everyday look that shouldn’t take more than 15 minutes of your precious time. By keeping it fresh and clean on the cheeks and lips I was able to make the eyes a bit more glamourous with the use of a Gel Eye-Liner, but still keeping everything quite natural, as I don’t like having tons of makeup on my face over the summer!
You can take this look from daytime to nighttime by just replacing the lip balm for a brighter lipstick and thickening the the line contouring your eyes!
Step 1: Prepare your skin
- Face Primer
- Tinted Moisturiser
- Foundation brush
I used Gosh Velvet Touch Foundation Primer Cream as it doubles as a moisturiser and a primer. This is definitely one of my favourite products of all time! I’ve never owned any Gosh products before, but I bought this about 2 months ago, and it just makes my skin feel so soft and it doesn’t melt at all with heat or sweat!
Then I used a MAC 188 brush to apply No.7 Triple Protection Tinted Moisturiser instead of using foundation all over my face, because as I already said on my previous post about this product, this summer, I’m going for a more natural look, rather than full coverage on my face!
Step 2: Concealer, powder and eye primer
- Concealer
- Foundation Powder
- Eyeshadow Primer
- Kabuki or buffer brush
I applied MAC Studio Finish Concealer under my eyes and on any red patches on my face, and set everything off with MAC Studio Fix Powder Plus Foundation using a Kabuki brush from Primark. Then I used Urban Decay Eyeshadow Primer Potion to prime my eyes and prevent my eyeshadows from creasing.
Step 3: Apply eyeshadows
- Light Matte
- Gold or Vanilla
- Pink champagne
- Deep coppery bronze
- Light brown- Dark Brown
- Light Champagne Beige
- Eyeshadow brush
- Blending brush
- Small angle brush
First and foremost, I used MAC Paint Pot in Soft Ochre on my eyelids to even out the colour and to have a clean base to apply other eyeshadows.
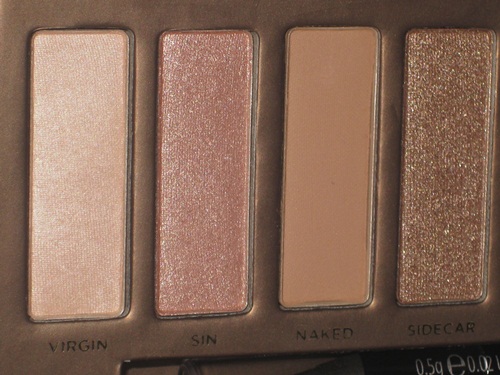
The first eyeshadow I used was MAC Nylon, a very shimmery vanilla/gold-ish colour, with a MAC 239 brush all over the lid, and then to give it a hint of pink, I used the same brush to add a layer of Urban Decay Sin on top of Nylon.
On the crease and outer corner of my eyes, I used Urban Decay Smog, which is a very pretty deep bronze colour, to give my eyes some depth and to create a soft contrast with the lighter colour I applied before. For this, used a MAC 217 brush.
Next with the same MAC 217, I used Urban Decay Naked, which is a light brown colour, in order to soften the outer edges of the eyeshadow lines around my eyes and blend them in with my skin tone just to give it a more polished look.
For my lower lash line I used a MAC 263 brush to apply Urban Decay Buck instead of black eyeliner or black eyeshadow because I don’t want this to be the focus of my eyes. So used brown just on the lash line, concentrating on the outer corner of my eyes.
For my brow bones I used Urban Decay Virgin as a highlighter, which is a light champagne/beige colour with the same MAC 239 I used before.

Step 4: Apply liquid or gel eyeliner and Mascara
- Black Gel or Liquid Eyeliner
- Black Mascara
This is what I want to be the focus of my look because it’s going to define my eyes and contrast with the softness of the eyeshadow colours on my lids.
I used MAC Fluidline Blacktrack on the same MAC 263 brush to draw a sharp thin line very close to my upper lash line and winged it out a bit in the end.
You can skip this step depending on how much time you have and how good you are at applying liquid eyeliner. Honestly, I’m not very good, so if I’m only going for a quick shopping trip, I sometimes skip it because it’s what takes me longer to do and if it’s not perfect, it’s not worth doing it!
For Mascara I used a little bit of MAC False Lashes Mascara.
Step 5: Contour your face and apply blush
- Bronzer
- Peachy blush
- Blush brush
- Bronzer or contour brush
I used MAC Coppertone Matte Powder Blush as a bronzer to lightly contour under my cheek bones with a Kabuki brush fro Primark, and on my cheeks I chose MAC Peaches Sheertone Blush and applied it with a No.7 powder blush brush.
Step 6: Lips
- Pink Lip Tint
- Lip Balm
Because the eyes are quite shimmery already, I used Benefit Benetint to enhance the natural colour of my lips and Vaseline Rosy Lips to keep them glossy and moisturised.

That’s it, girls! I know it sounds like quite a lot, but it really isn’t! I wanted to make this as thorough as possible so everyone can easily recreate this look. If you don’t have the same producs I used, try and find a similar one that you have based on the colour descriptions I gave.
As I said before, I’ve been using this quite a lot lately and I love it! I hope you like it as well :))
Please leave your comments, questions and tips bellow, and don’t forget to enter my giveaway of a Sigma E25 Blending Brush HERE!


6 Comments
Ylle Carolinne
Ai que lindaa!!!Ameii!!!Não li o tutorial todo, mas um dia que eu for sair vou tentar!!!Pra mim, maquiagem é pra sair…ehheehhehe
Da próxima faça um look noite, com cinza ou marrom, vou amar!!!Ou um look inspirado em alguma famosa, tipo o de Mila Kunis no MMA!
E fáça vídeo sispa, fica mais fácil de tirar as dúvidas e é mais legal, deixe de vergonha besta!!!
:***
The Beauty Group™
@Ylle Pri falou a mesma coisa! Vocês estão juntas? hehe
Vou fazer um tutorial de celebridade no próximo!
Vídeo nãããão, sispaaaa… tá bom com fotinhas! Tenho vergoooonha :))
adoreabubbles
Lovely eyes, very striking but not over the top :D
Ina
Já falei tudo pessoalmente mas comments sempre são bem vindos, né?
Lindooo prizocaaa! Adorei!
Agora é só seguir as dicas da sua consultora de blogs! Hahahahahahaha!
\o/
The Beauty Group™
@adoreabubbles Thanks, dear! It’s my favourite look of the moment :) Very easy, very chic!
Xx
The Beauty Group™
@Ina minha consultoraaaaaa! Adoro suas dicas… Continue participando! Beeeeijo :)